
nginx-ui
Yet another WebUI for Nginx
 0xJacky
- 评测生成时间(北京时间)
- 本报告引擎
- v3.10.0
- 当前引擎
- v3.16.0
本报告与当前引擎使用不同规则;原分数不会自动更新,不同版本的分数不宜直接对比。
进入后确认来源与额度,提交才会创建任务。
综合采用结论
证据充分,整体质量与安全表现优秀
- 基础评测完成+25/25确定性评分与静态安全扫描已完成
- README 有效证据+25/2513,998 个去重后的有效字符
- 独立证据来源+20/206 类非重复证据,重复文件不叠加
- 仓库元数据+10/10已取得仓库状态与采用数据
- 活跃记录+5/5已取得最近提交时间
- AI 复核+15/15已完成结构化 AI 证据复核
Nginx UI 架构概览
README 描述了 Nginx UI 作为 WebUI 与 Nginx 交互,包含前端、后端、Nginx 配置目录等组件,无明确时序关系,适合架构图。
左右滑动查看完整图示
- • Features 提到 'Online editing websites configurations'
- • Before Use 说明配置文件放在 sites-available 和 sites-enabled
- • Docker 部署映射 /etc/nginx 卷
- Features 部分列出 MCP 功能:'MCP (Model Context Protocol) provides special interfaces for AI agents'
- 安装章节提供 Docker 命令:'docker run -dit ... uozi/nginx-ui:latest'
- Usage 部分提供可执行文件运行命令:'nginx-ui -config app.ini'
- 文档结构包含 'Example of Nginx Reverse Proxy Configuration' 章节
- License 部分声明 AGPL-3.0
- 有效 README
- 安装或接入步骤
- 可执行示例
- 输入、参数或工具说明
- 未发现已知高风险模式
- 缺少问题与用途描述
- 缺少输出或结果说明
- MCP 功能仅提及,无具体接口说明
- 缺少输出或结果格式说明
- 错误处理与排障信息不足
需要图形化界面管理 Nginx 的运维人员、希望自动化配置管理和服务控制的场景、多服务器集群环境下的统一管理、需要集成 AI 助手(ChatGPT)辅助配置的用户
需要纯 MCP 接口集成且无 WebUI 需求的场景、对 MCP 协议有严格规范要求的开发者
也有自己的公开项目?先看完证据,再用当前规则生成独立报告。
评测我的项目 →静态扫描不是安全保证,生产接入前仍应人工复核权限和数据边界。
- 01补充问题与用途描述
- 02补充输出或结果说明
方法、证据与局限展开收起
GitHub Repository API
12 个文件 · 37,992 字符
v3.10.0 · AI 复核已启用(deepseek-chat)
- 静态评测不会安装或执行项目代码
- 安全扫描基于高信号文件与已知模式,不能替代人工审计
- 流行度只反映采用程度,不代表安全或工程质量
README

Nginx UI
Yet another Nginx Web UI, developed by 0xJacky, Hintay and Akino.



 Proudly hosted on AtomGit — a part of the G-Star program.













Documentation
To check out docs, visit nginxui.com.
Sponsor
If you find this project helpful, please consider sponsoring us to support ongoing development and maintenance.


Sponsors

Protect and accelerate websites and APIs with consistent access performance across mainland China and worldwide, and extend acceleration and security to native and mobile apps through client SDKs — Self-hosted private CDN|Subscription-based anti-DDoS CDN|A self-controlled, flexibly composable CDN network.
Official Community Group
Join the official Nginx UI WeChat community group to discuss usage, deployment ideas, and troubleshooting with other community members.
Scan the QR code below to add us on WeChat, and include Nginx UI Community Group in your request. The administrator will invite you to the official community group.

Your support helps us:
- 🚀 Accelerate the development of new features
- 🐛 Fix bugs and improve stability
- 📚 Enhance documentation and tutorials
- 🌐 Provide better community support
- 💻 Maintain infrastructure and demo servers
Tooling Support

Thanks to JetBrains for supporting us with free open source licenses.
Stargazers over time

English | Español | 简体中文 | 繁體中文 | Tiếng Việt | 日本語
Table of Contents
About The Project
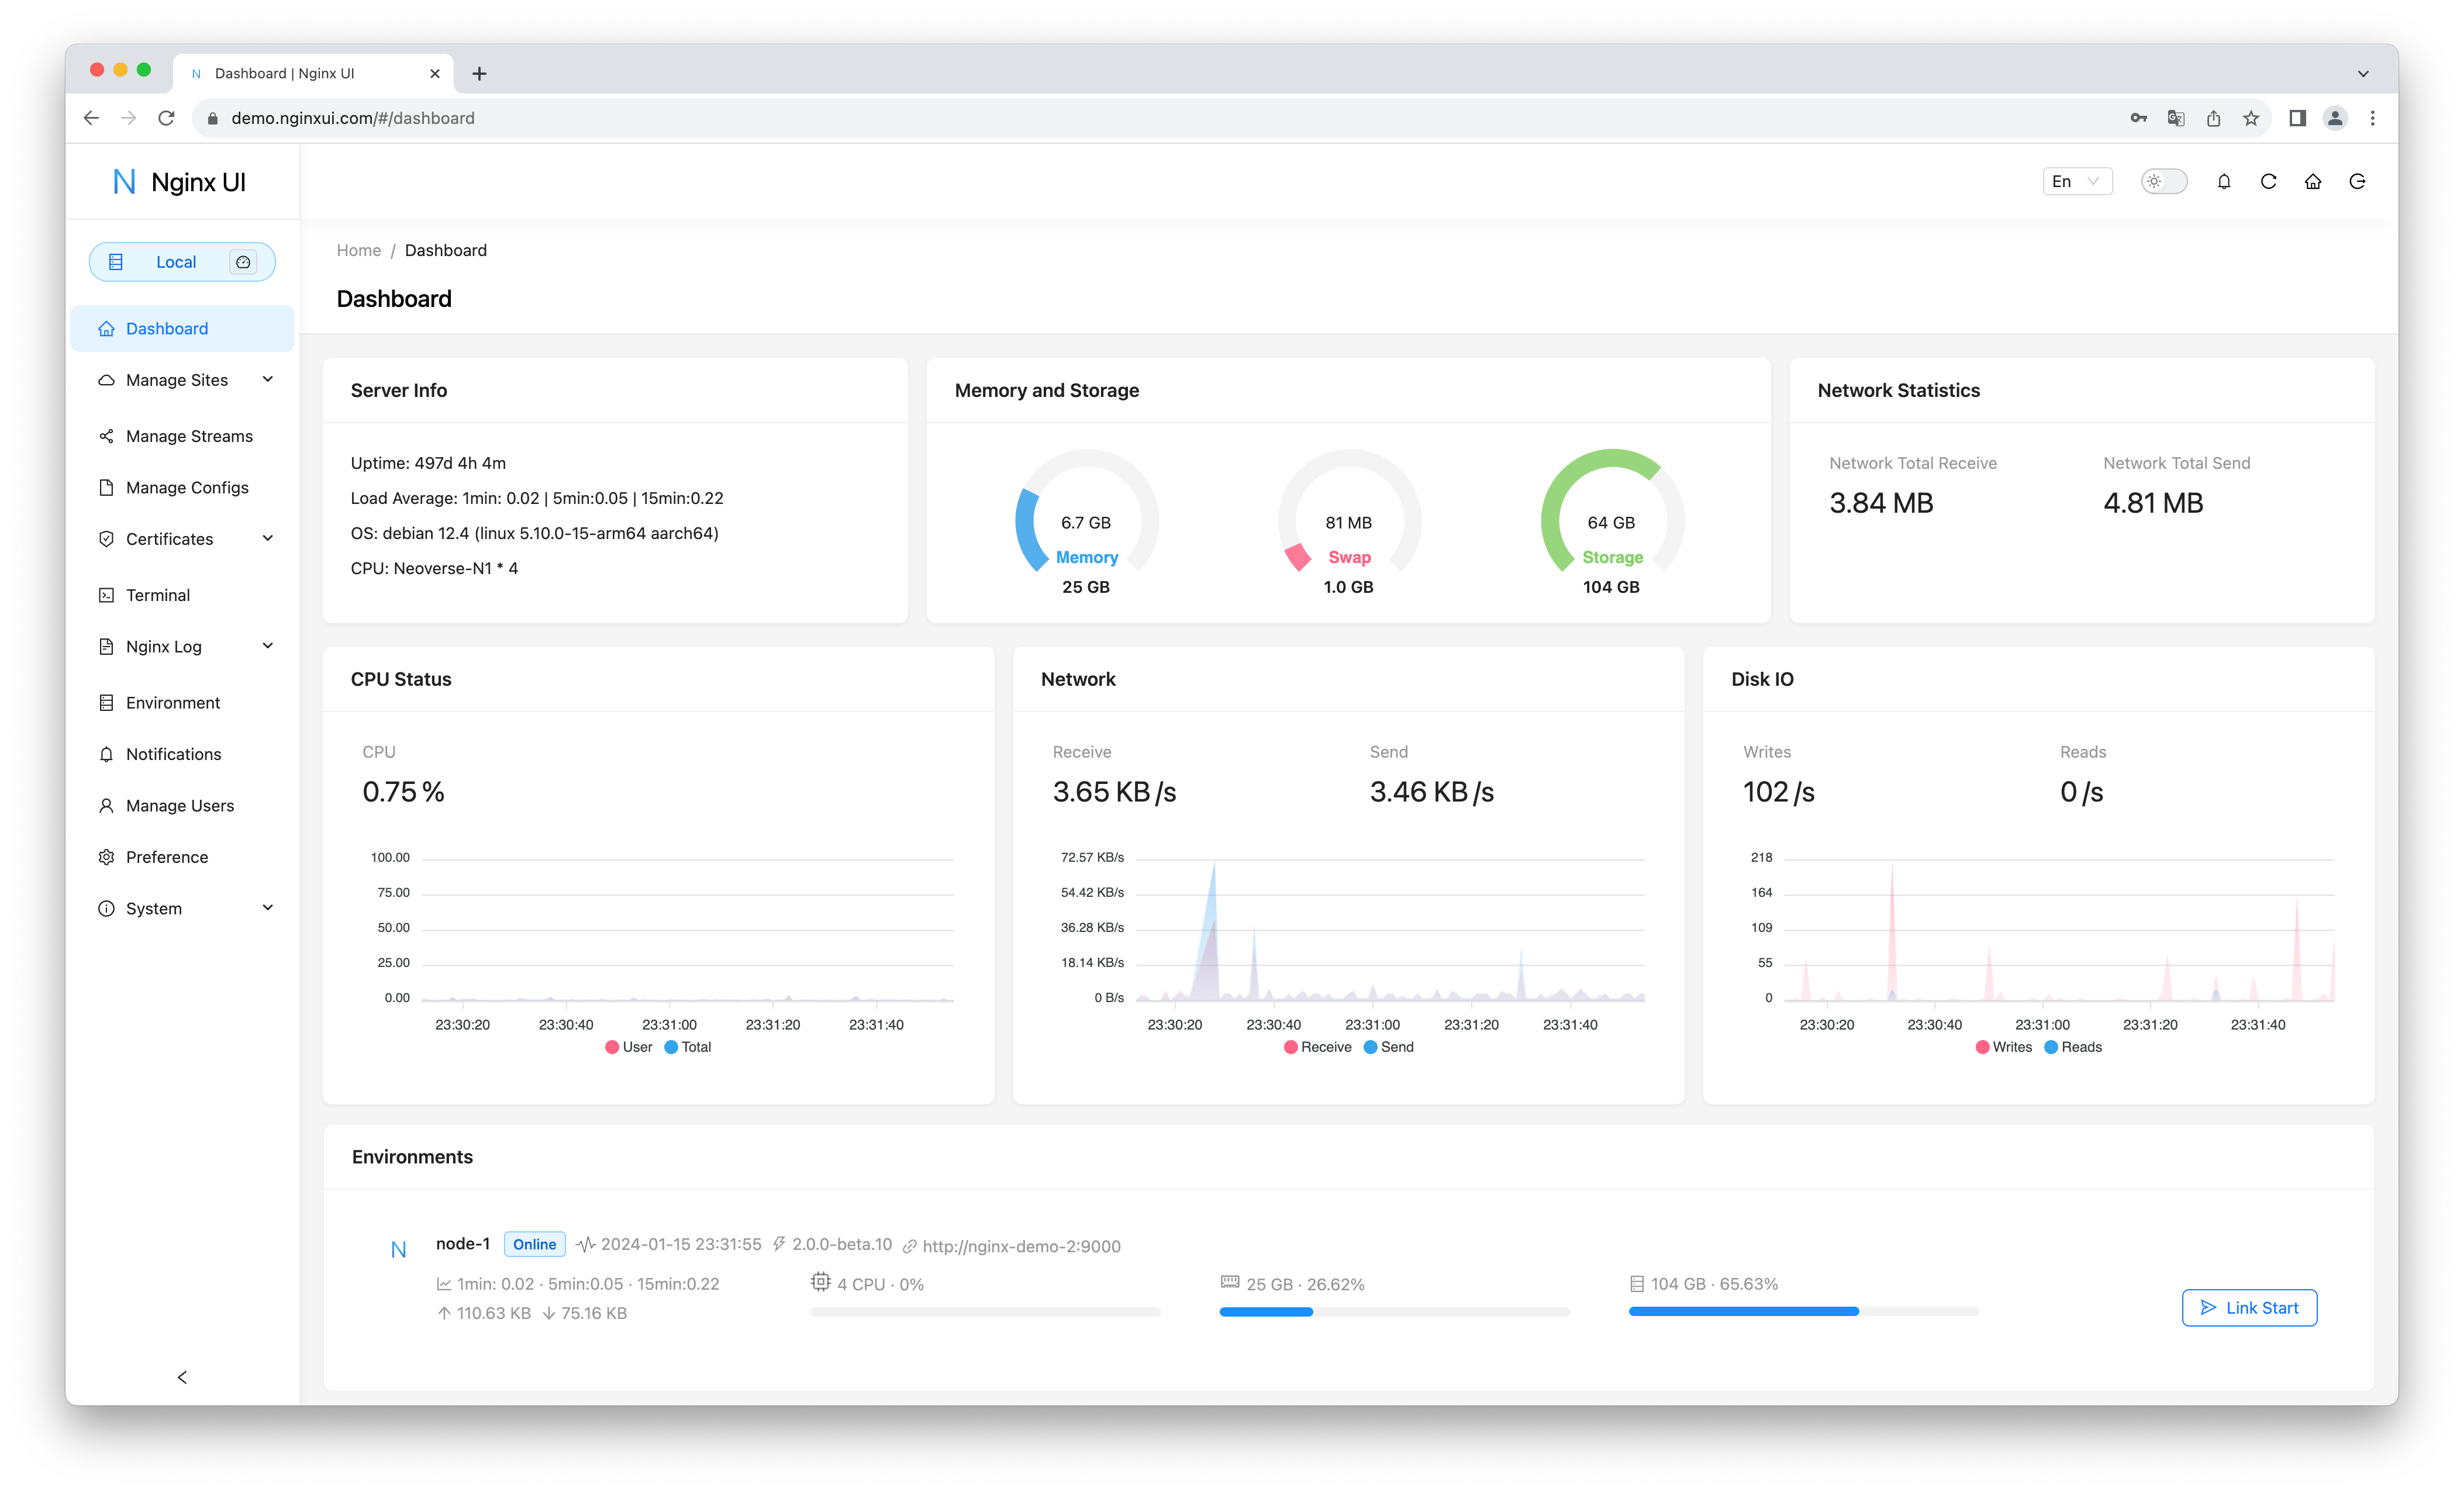
Demo
- Username:admin
- Password:admin
Features
- Online statistics for server indicators such as CPU usage, memory usage, load average, and disk usage.
- Automatic configuration backup after changes, with version comparison and restore capabilities
- Cluster management supporting mirroring operations to multiple nodes, making multi-server environments easy to manage
- Export encrypted Nginx / Nginx UI configurations for quick deployment and recovery to new environments
- Enhanced online ChatGPT assistant supporting multiple models, including Deepseek-R1's chain-of-thought display to help you better understand and optimize configurations
- MCP (Model Context Protocol) provides special interfaces for AI agents to interact with Nginx UI, enabling automated configuration management and service control.
- One-click deployment and automatic renewal Let's Encrypt certificates.
- Online editing websites configurations with our self-designed NgxConfigEditor which is a user-friendly block editor for nginx configurations or Ace Code Editor which supports LLM Code Completion and highlighting nginx configuration syntax.
- Online view Nginx logs
- Written in Go and Vue, distribution is a single executable binary.
- Automatically test configuration file and reload nginx after saving configuration.
- Web Terminal
- Dark Mode
- Responsive Web Design
Internationalization
We proudly offer official support for:
- English
- Simplified Chinese
- Traditional Chinese
As non-native English speakers, we strive for accuracy, but we know there's always room for improvement. If you spot any issues, we'd love your feedback!
Thanks to our amazing community, additional languages are also available! Explore and contribute to translations on Weblate.
Getting Started
Before Use
The Nginx UI follows the Debian web server configuration file standard. Created site configuration files will be placed in the sites-available folder that under the Nginx configuration folder (auto-detected). The configuration files for an enabled site will create a soft link to the sites-enabled folder. You may need to adjust the way the configuration files are organised.
For non-Debian (and Ubuntu) systems, you may need to change the contents of the nginx.conf configuration file to the Debian style as shown below.
http {
	# ...
	include /etc/nginx/conf.d/*.conf;
	include /etc/nginx/sites-enabled/*;
}
For more information: debian/conf/nginx.conf
Installation
Nginx UI is available on the following platforms:
- macOS 11 Big Sur and later (amd64 / arm64)
- Windows 10 and later (amd64 / arm64)
- Linux 2.6.23 and later (x86 / amd64 / arm64 / armv5 / armv6 / armv7 / mips32 / mips64 / riscv64 / loongarch64)
- Including but not limited to Debian 7 / 8, Ubuntu 12.04 / 14.04 and later, CentOS 6 / 7, Arch Linux
- FreeBSD
- OpenBSD
- Dragonfly BSD
- Openwrt
You can visit latest release to download the latest distribution, or just use installation scripts for Linux.
Usage
In the first runtime of Nginx UI, please visit http://<your_server_ip>:<listen_port>
in your browser to complete the follow-up configurations.
From Executable
Run Nginx UI in Terminal
nginx-ui -config app.ini
Press Control+C in the terminal to exit Nginx UI.
Run Nginx UI in Background
nohup ./nginx-ui -config app.ini &
Stop Nginx UI with the follow command.
kill -9 $(ps -aux | grep nginx-ui | grep -v grep | awk '{print $2}')
With Systemd
If you are using the installation script for Linux, the Nginx UI will be installed as nginx-ui service in systemd. Please use the systemctl command to control it.
Start Nginx UI
systemctl start nginx-ui
Stop Nginx UI
systemctl stop nginx-ui
Restart Nginx UI
systemctl restart nginx-ui
With Docker
Our docker image uozi/nginx-ui:latest is based on the latest nginx image and can be used to replace the Nginx on the host. By publishing the container's port 80 and 443 to the host, you can easily make the switch.
Note
- When using this container for the first time, ensure that the volume mapped to /etc/nginx is empty.
- If you want to host static files, you can map directories to container.
- If you are upgrading from an older image, see the Docker WebSocket fix guide for required
conf.d/nginx-ui.confupdates.
Deploy with Docker
-
Then deploy nginx-ui like this:
docker run -dit \
  --name=nginx-ui \
  --restart=always \
  -e TZ=Asia/Shanghai \
  -v /mnt/user/appdata/nginx:/etc/nginx \
  -v /mnt/user/appdata/nginx-ui:/etc/nginx-ui \
  -v /var/run/docker.sock:/var/run/docker.sock \
  -p 8080:80 -p 8443:443 \
  uozi/nginx-ui:latest
- When your docker container is running, Log in to nginx-ui panel with
http://<your_server_ip>:8080/install. If you change the port mapping, access Nginx UI through the host port mapped to container port80instead.
Deploy with Docker-Compose
-
Create a docker-compose.yml file like this:
services:
    nginx-ui:
        stdin_open: true
        tty: true
        container_name: nginx-ui
        restart: always
        environment:
            - TZ=Asia/Shanghai
        volumes:
            - '/mnt/user/appdata/nginx:/etc/nginx'
            - '/mnt/user/appdata/nginx-ui:/etc/nginx-ui'
            - '/var/www:/var/www'
            - '/var/run/docker.sock:/var/run/docker.sock'
        ports:
            - 8080:80
            - 8443:443
        image: 'uozi/nginx-ui:latest'
- Then creat your container by:
docker compose up -d
- When your docker container is running, Log in to nginx-ui panel with
http://<your_server_ip>:8080/install. If you change the port mapping, access Nginx UI through the host port mapped to container port80instead.
Manual Build
On platforms that do not have an official build version, they can be built manually.
Prerequisites
-
Make
-
Golang 1.23+
-
node.js 21+
npx browserslist@latest --update-db
Build Frontend
Please execute the following command in app directory.
bun install
bun run build
Build Backend
Please build the app first, and then execute the following command in the project root directory.
go generate
go build -tags=jsoniter -ldflags "$LD_FLAGS -X 'github.com/0xJacky/Nginx-UI/settings.buildTime=$(date +%s)'" -o nginx-ui -v main.go
Script for Linux
Basic Usage
Install and Upgrade
bash -c "$(curl -L https://cloud.nginxui.com/install.sh)" @ install
The default listening port is 9000, and the default HTTP Challenge port is 9180.
If there is a port conflict, please modify /usr/local/etc/nginx-ui/app.ini manually,
then use systemctl restart nginx-ui to reload the Nginx UI service.
Remove Nginx UI, except configuration and database files
bash -c "$(curl -L https://cloud.nginxui.com/install.sh)" @ remove
More Usage
bash -c "$(curl -L https://cloud.nginxui.com/install.sh)" @ help
Example of Nginx Reverse Proxy Configuration
server {
    listen          80;
    listen          [::]:80;

    server_name     <your_server_name>;
    rewrite ^(.*)$  https://$host$1 permanent;
}

map $http_upgrade $connection_upgrade {
    default upgrade;
    ''      close;
}

server {
    listen  443       ssl;
    listen  [::]:443  ssl;
    http2   on;

    server_name         <your_server_name>;

    ssl_certificate     /path/to/ssl_cert;
    ssl_certificate_key /path/to/ssl_cert_key;

    location / {
        proxy_set_header    Host                $host;
        proxy_set_header    X-Real-IP           $remote_addr;
        proxy_set_header    X-Forwarded-For     $proxy_add_x_forwarded_for;
        proxy_set_header    X-Forwarded-Proto   $scheme;
        proxy_http_version  1.1;
        proxy_set_header    Upgrade             $http_upgrade;
        proxy_set_header    Connection          $connection_upgrade;
        proxy_pass          http://127.0.0.1:9000/;
    }
}
Contributing
Contributions are what make the open source community such an amazing place to learn, inspire, and create. Any contributions you make are greatly appreciated.
If you have a suggestion that would make this better, please fork the repo and create a pull request. You can also simply open an issue with the tag "enhancement". Don't forget to give the project a star! Thanks again!
- Fork the Project
- Create your Feature Branch (
git checkout -b feature/AmazingFeature) - Commit your Changes (
git commit -m 'Add some AmazingFeature') - Push to the Branch (
git push origin feature/AmazingFeature) - Open a Pull Request
License
This project is provided under a GNU Affero General Public License v3.0 license that can be found in the LICENSE file. By using, distributing, or contributing to this project, you agree to the terms and conditions of this license.