
mcp-server-notion
Notion API 的 MCP server。读、写、搜索 Notion 页面和数据库。
 Notion
- 评测生成时间(北京时间)
- 本报告引擎
- v3.10.0
- 当前引擎
- v3.16.0
本报告与当前引擎使用不同规则;原分数不会自动更新,不同版本的分数不宜直接对比。
进入后确认来源与额度,提交才会创建任务。
综合采用结论
证据充分,整体质量与安全表现优秀
- 基础评测完成+25/25确定性评分与静态安全扫描已完成
- README 有效证据+25/2512,939 个去重后的有效字符
- 独立证据来源+4/201 类非重复证据,重复文件不叠加
- 仓库元数据+10/10已取得仓库状态与采用数据
- 活跃记录+5/5已取得最近提交时间
- AI 复核+15/15已完成结构化 AI 证据复核
MCP客户端与Notion服务器交互流程
文档展示了客户端通过MCP服务器调用Notion API的请求-响应流程,涉及多个参与方。
左右滑动查看完整图示
- • 示例章节展示AI计划两个API调用完成评论任务
- • 传输选项章节说明HTTP请求需包含Authorization头
- • v2.0.0章节说明工具自动发现
- README中列出22个工具,如query-data-source、retrieve-page-markdown
- 安装章节提供npm和Docker配置示例,包括NOTION_TOKEN和OPENAPI_MCP_HEADERS
- 传输选项章节说明stdio和HTTP模式,以及--auth-token等参数
- 示例章节展示自然语言指令如何映射到API调用
- v2.0.0变更章节列出移除和新增的工具
- 问题与用途描述
- 有效 README
- 安装或接入步骤
- 可执行示例
- 未发现已知高风险模式
- 缺少错误处理或排障
- 缺少许可证信息
- 缺少错误处理与排障指南
- 官方声明优先支持远程MCP,本地仓库可能停止维护
- v2.0.0破坏性变更,旧工具被移除
需要将Notion集成到AI代理的开发者、使用Cursor、Claude等MCP客户端的用户、需要高效读写Notion页面内容的场景、需要多租户或多种Notion集成的部署
需要长期稳定支持且不愿迁移到远程MCP的用户、需要删除数据库等高级管理操作的用户(API限制)、对错误处理文档有严格要求的团队
也有自己的公开项目?先看完证据,再用当前规则生成独立报告。
评测我的项目 →静态扫描不是安全保证,生产接入前仍应人工复核权限和数据边界。
- 01补充错误处理或排障
- 02补充许可证信息
方法、证据与局限展开收起
GitHub Repository API、Package registry metrics
1 个文件 · 16,247 字符
v3.10.0 · AI 复核已启用(deepseek-chat)
- 静态评测不会安装或执行项目代码
- 安全扫描基于高信号文件与已知模式,不能替代人工审计
- 流行度只反映采用程度,不代表安全或工程质量
README
Notion MCP Server
[!NOTE]
We’ve introduced Notion MCP, a remote MCP server with the following improvements:
- Easy installation via standard OAuth. No need to fiddle with JSON or API tokens anymore.
- Powerful tools tailored to AI agents, including editing pages in Markdown. These tools are designed with optimized token consumption in mind.
Learn more and get started at Notion MCP documentation.
We are prioritizing, and only providing active support for, Notion MCP (remote). As a result:
- We may sunset this local MCP server repository in the future.
- Issues and pull requests here are not actively monitored.
- Please do not file issues relating to the remote MCP here; instead, contact Notion support.
This project implements an MCP server for the Notion API.
⚠️ Version 2.0.0 breaking changes
Version 2.0.0 migrates to the Notion API 2025-09-03 which introduces data sources as the primary abstraction for databases.
What changed
Removed tools (3):
post-database-query- replaced byquery-data-sourceupdate-a-database- replaced byupdate-a-data-sourcecreate-a-database- replaced bycreate-a-data-source
New tools (7):
query-data-source- Query a data source (database) with filters and sortsretrieve-a-data-source- Get metadata and schema for a data sourceupdate-a-data-source- Update data source propertiescreate-a-data-source- Create a new data sourcelist-data-source-templates- List available templates in a data sourcemove-page- Move a page to a different parent locationretrieve-a-database- Get database metadata including its data source IDs
Parameter changes:
- All database operations now use
data_source_idinstead ofdatabase_id - Search filter values changed from
["page", "database"]to["page", "data_source"] - Page creation now supports both
page_idanddatabase_idparents (for data sources)
Do I need to migrate?
No code changes required. MCP tools are discovered automatically when the server starts. When you upgrade to v2.0.0, AI clients will automatically see the new tool names and parameters. The old database tools are no longer available.
If you have hardcoded tool names or prompts that reference the old database tools, update them to use the new data source tools:
| Old Tool (v1.x) | New Tool (v2.0) | Parameter Change |
|---|---|---|
post-database-query | query-data-source | database_id → data_source_id |
update-a-database | update-a-data-source | database_id → data_source_id |
create-a-database | create-a-data-source | No change (uses parent.page_id) |
Note:
retrieve-a-databaseis still available and returns database metadata including the list of data source IDs. Useretrieve-a-data-sourceto get the schema and properties of a specific data source.
Total tools now: 22 (was 19 in v1.x)
Page content as Markdown
The server exposes two tools for working with page content as enhanced Markdown instead of block JSON, which is significantly more token-efficient for AI agents:
retrieve-page-markdown— Read a page's full content as Markdown (GET /v1/pages/{page_id}/markdown). Passinclude_transcript: trueto inline meeting-note transcripts.update-page-markdown— Edit a page's content with Markdown (PATCH /v1/pages/{page_id}/markdown). Preferreplace_contentto overwrite the whole page, orupdate_contentfor targeted find-and-replace edits.
These endpoints require Notion API version 2026-03-11. The server now sources the Notion-Version header per operation from the OpenAPI spec, so these tools use 2026-03-11 while the rest of the API continues to use 2025-09-03 — no configuration needed. If you set Notion-Version yourself via OPENAPI_MCP_HEADERS, your value takes precedence for every tool.
Installation
1. Setting up integration in Notion
Go to https://www.notion.so/profile/integrations and create a new internal integration or select an existing one.
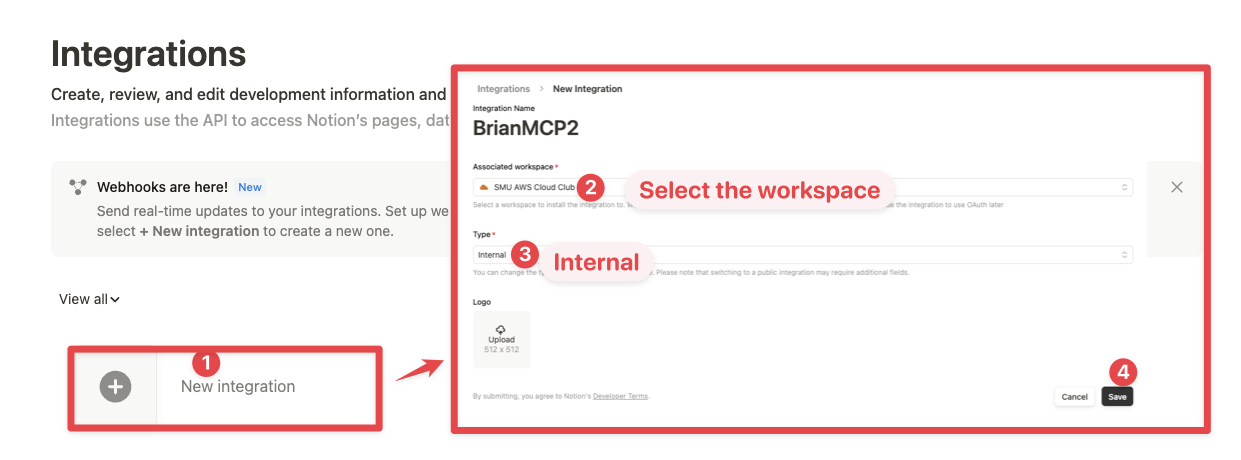
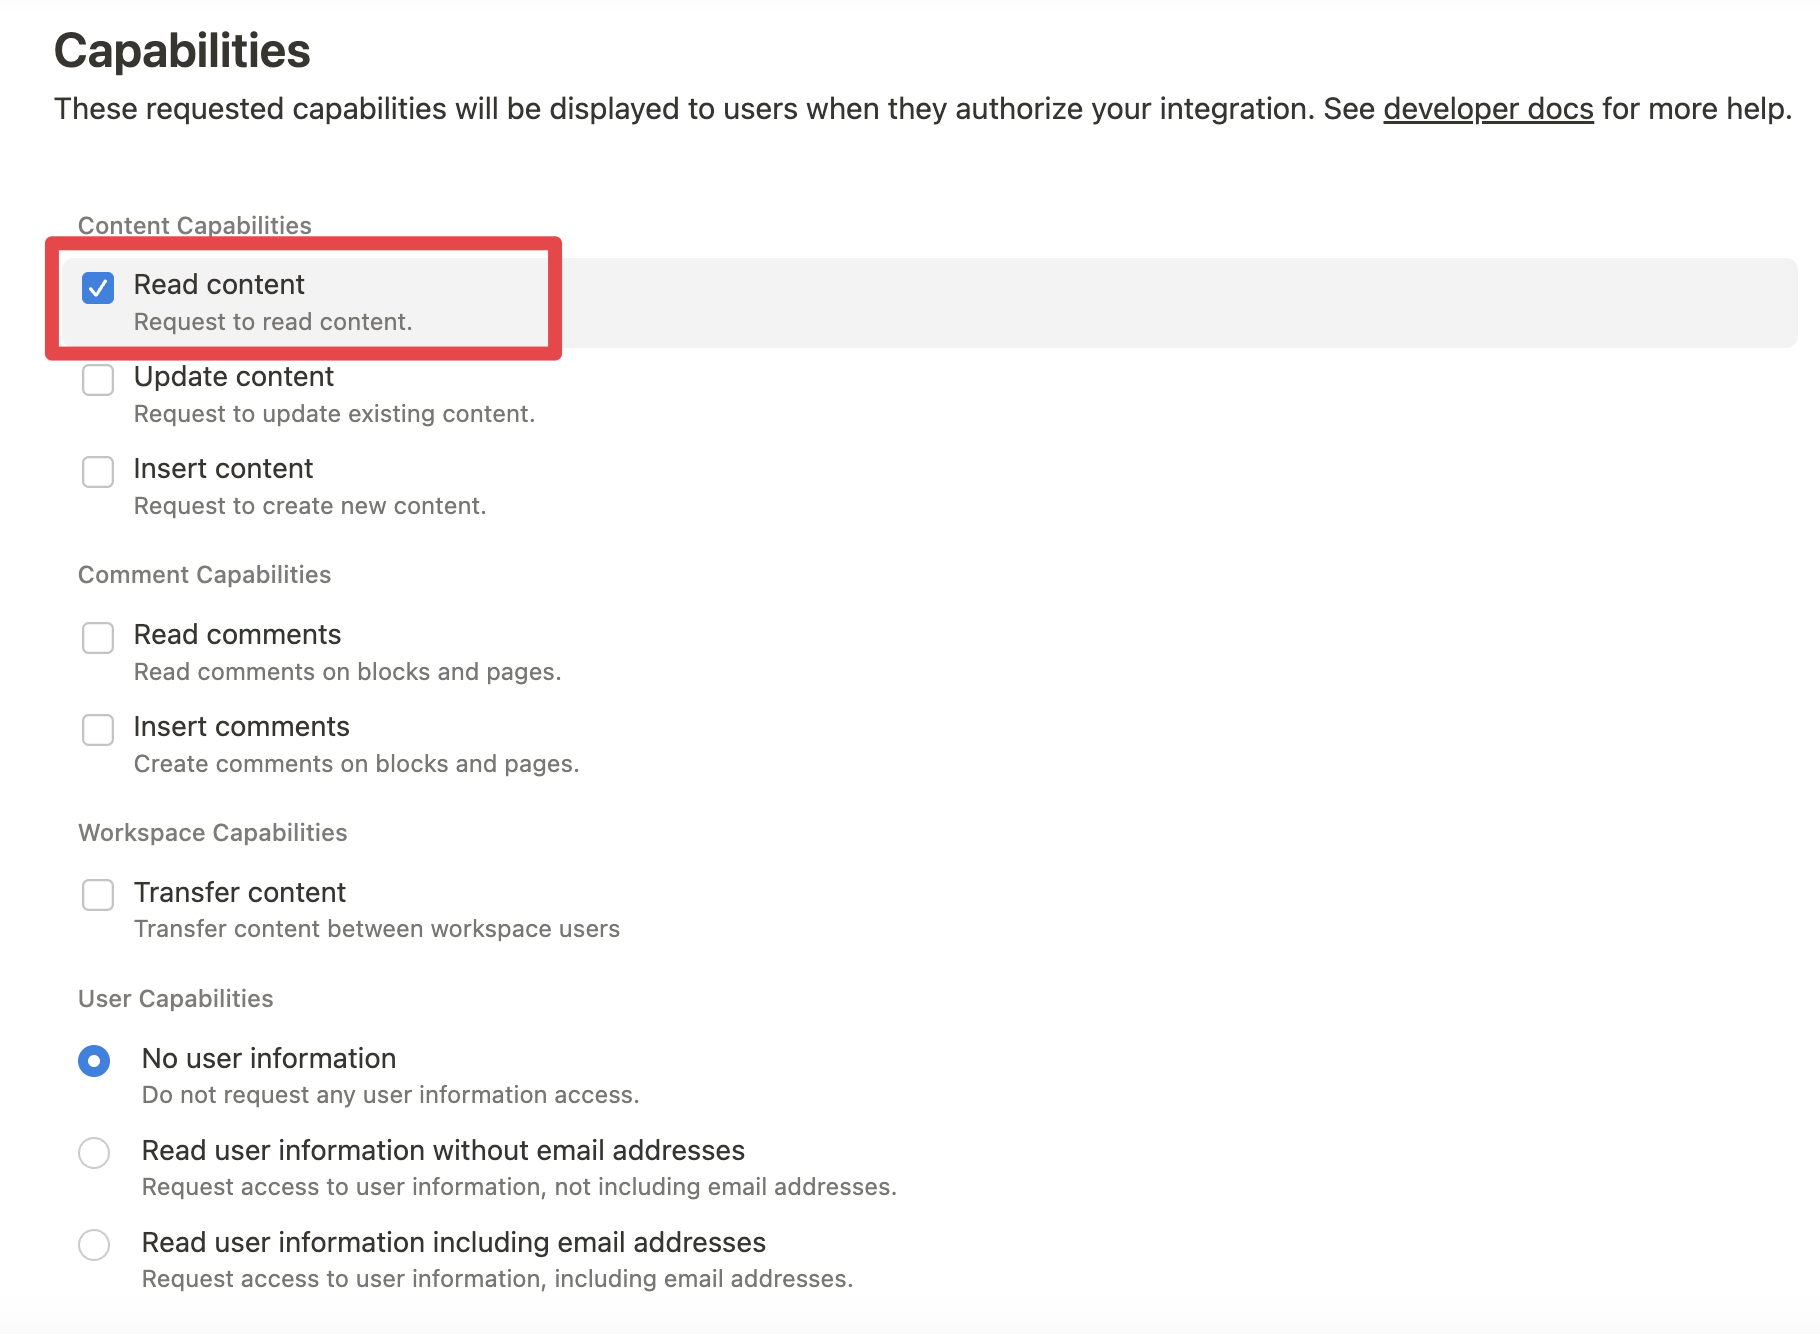
While we limit the scope of Notion API's exposed (for example, you will not be able to delete databases via MCP), there is a non-zero risk to workspace data by exposing it to LLMs. Security-conscious users may want to further configure the Integration's Capabilities.
For example, you can create a read-only integration token by giving only "Read content" access from the "Configuration" tab:
2. Connecting content to integration
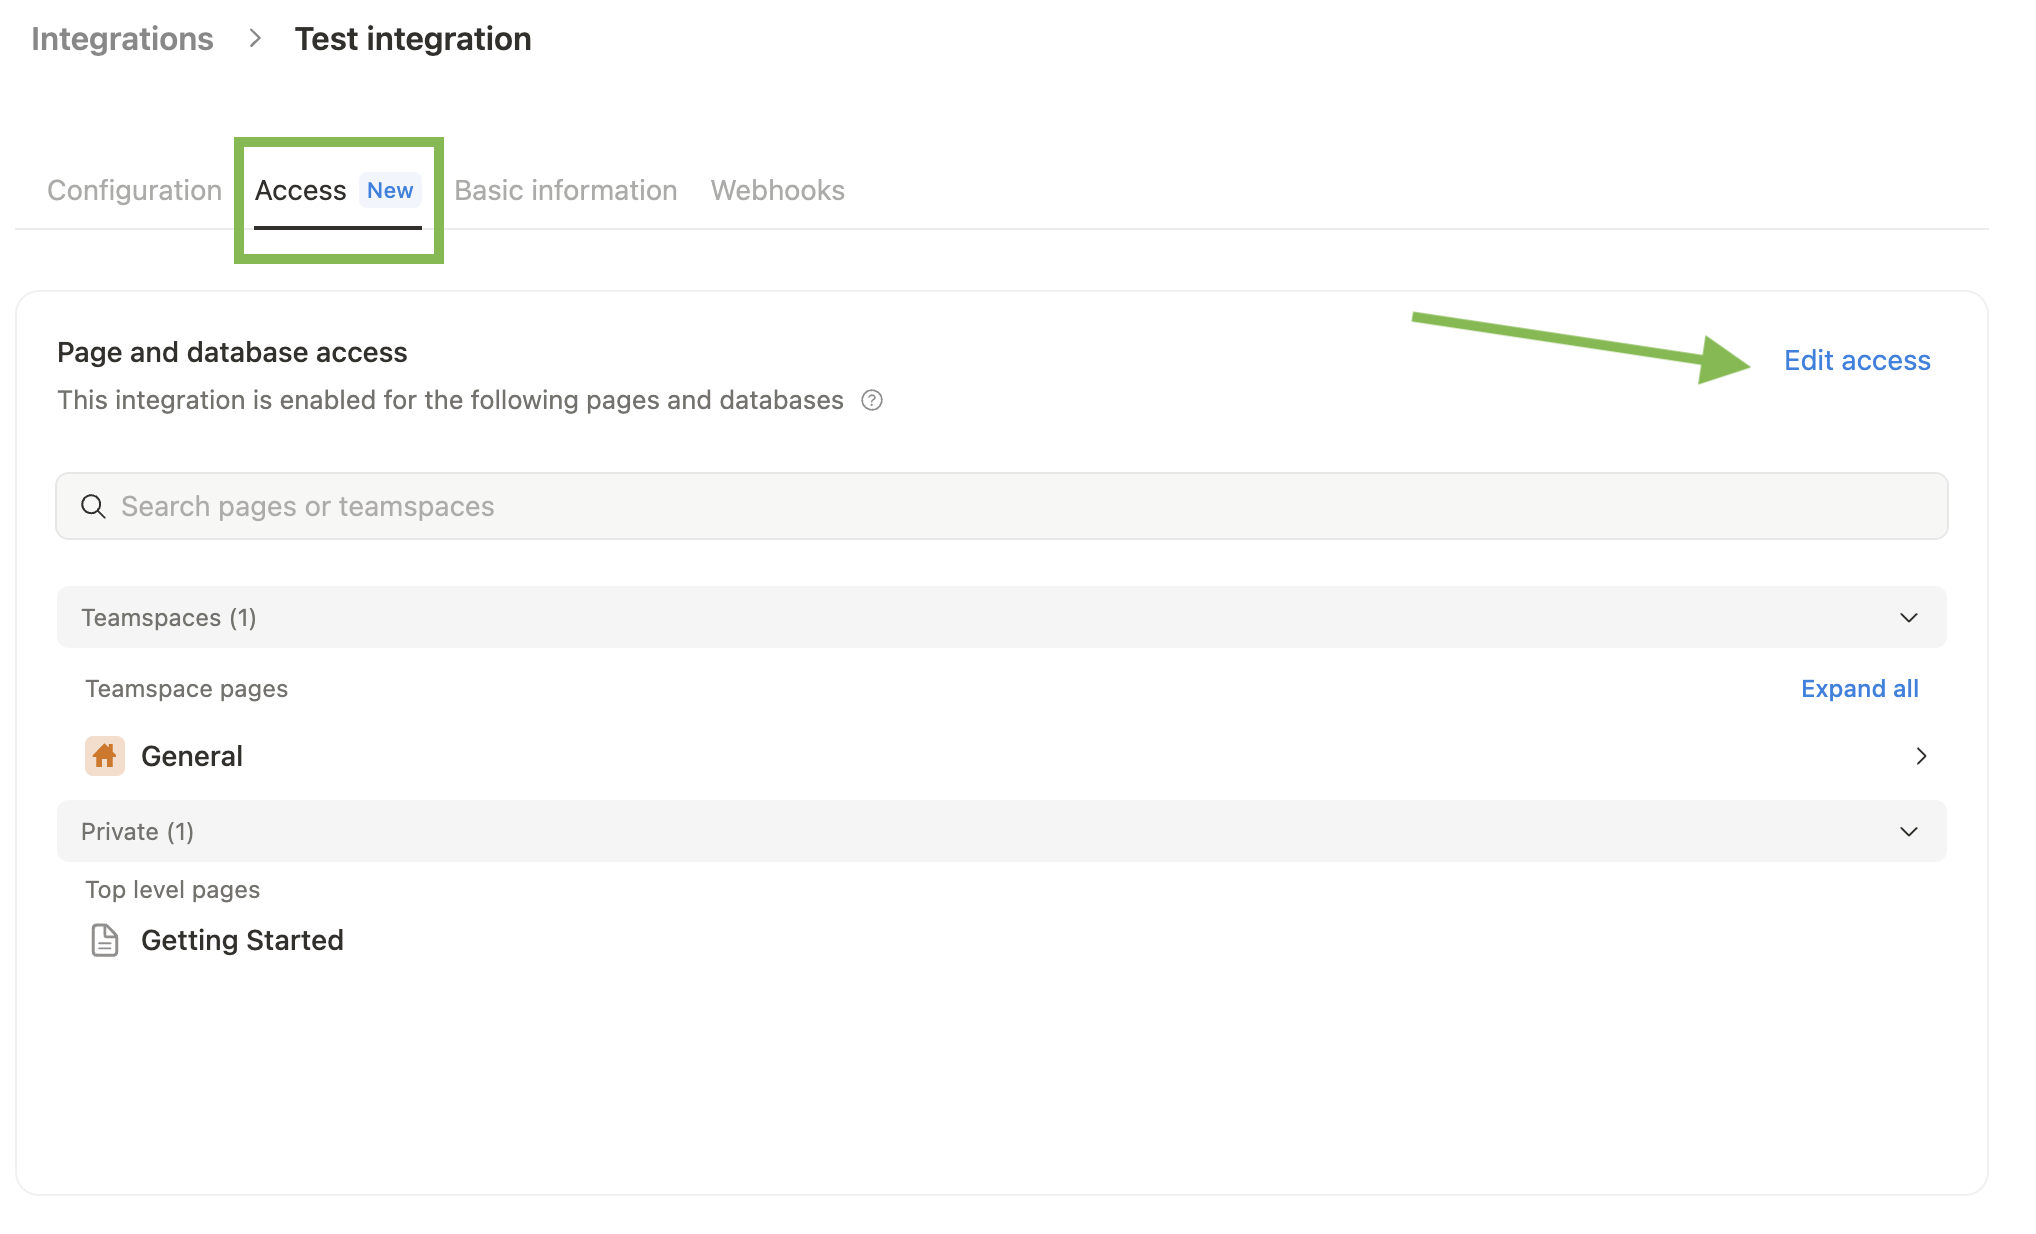
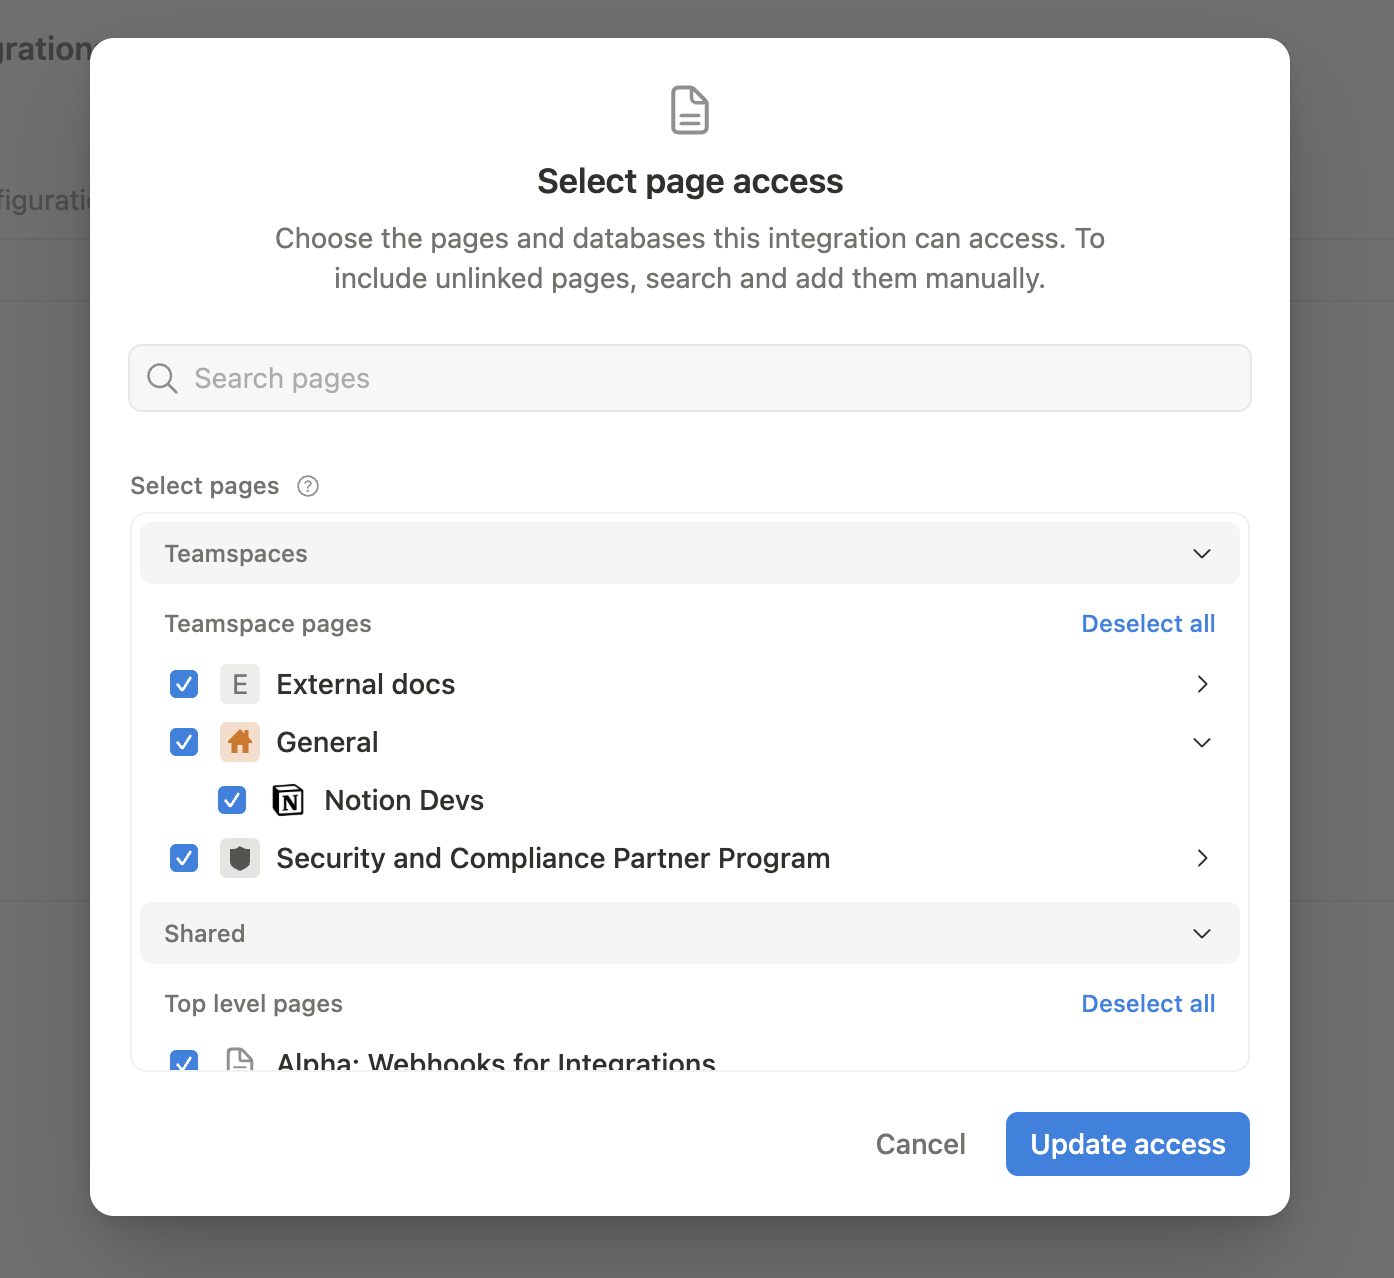
Ensure relevant pages and databases are connected to your integration.
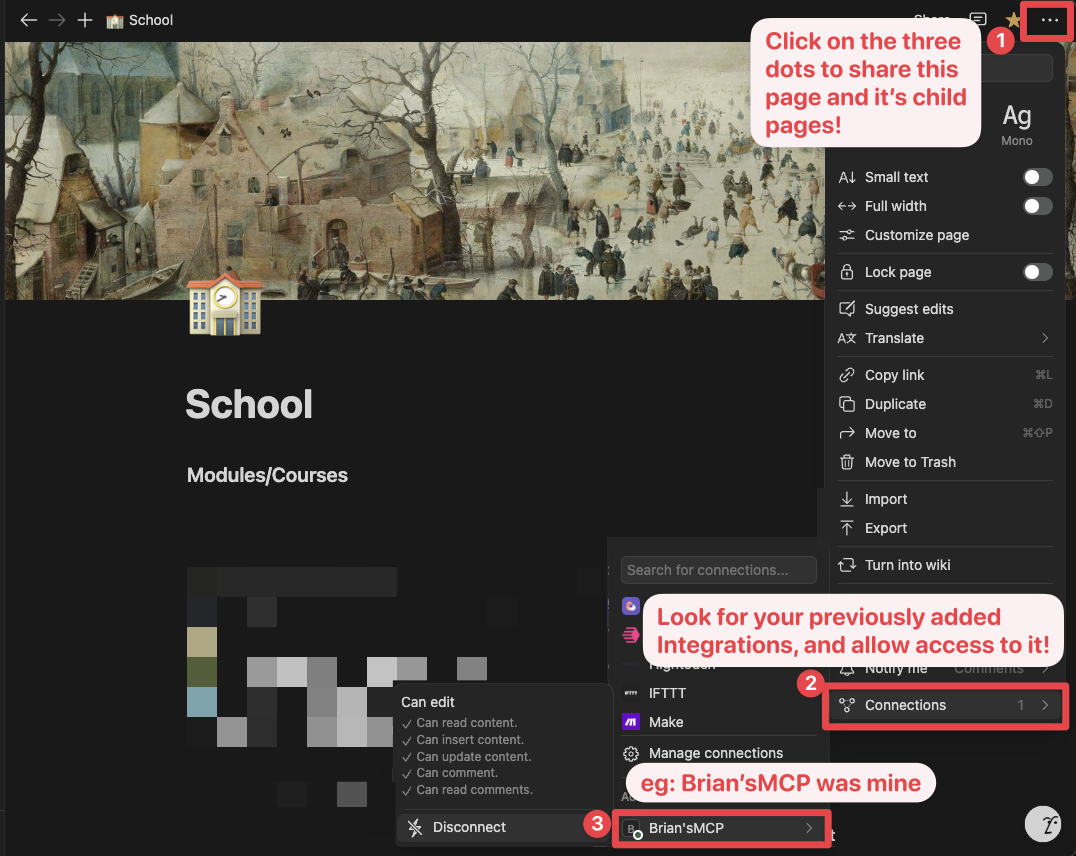
To do this, visit the Access tab in your internal integration settings. Edit access and select the pages you'd like to use.
Alternatively, you can grant page access individually. You'll need to visit the target page, and click on the 3 dots, and select "Connect to integration".
3. Adding MCP config to your client
Using npm
Cursor & Claude
Add the following to your .cursor/mcp.json or claude_desktop_config.json (MacOS: ~/Library/Application\ Support/Claude/claude_desktop_config.json)
Option 1: Using NOTION_TOKEN (recommended)
{
  "mcpServers": {
    "notionApi": {
      "command": "npx",
      "args": ["-y", "@notionhq/notion-mcp-server"],
      "env": {
        "NOTION_TOKEN": "ntn_****"
      }
    }
  }
}
Option 2: Using OPENAPI_MCP_HEADERS (for advanced use cases)
{
  "mcpServers": {
    "notionApi": {
      "command": "npx",
      "args": ["-y", "@notionhq/notion-mcp-server"],
      "env": {
        "OPENAPI_MCP_HEADERS": "{\"Authorization\": \"Bearer ntn_****\", \"Notion-Version\": \"2025-09-03\" }"
      }
    }
  }
}
Zed
Add the following to your settings.json
{
  "context_servers": {
    "some-context-server": {
      "command": {
        "path": "npx",
        "args": ["-y", "@notionhq/notion-mcp-server"],
        "env": {
          "OPENAPI_MCP_HEADERS": "{\"Authorization\": \"Bearer ntn_****\", \"Notion-Version\": \"2025-09-03\" }"
        }
      },
      "settings": {}
    }
  }
}
GitHub Copilot CLI
Use the Copilot CLI to interactively add the MCP server:
/mcp add
Alternatively, create or edit the configuration file ~/.copilot/mcp-config.json and add:
{
  "mcpServers": {
    "notionApi": {
      "command": "npx",
      "args": ["-y", "@notionhq/notion-mcp-server"],
      "env": {
        "NOTION_TOKEN": "ntn_****"
      }
    }
  }
}
For more information, see the Copilot CLI documentation.
Using Docker
There are two options for running the MCP server with Docker:
Option 1: Using the official Docker Hub image
Add the following to your .cursor/mcp.json or claude_desktop_config.json
Using NOTION_TOKEN (recommended):
{
  "mcpServers": {
    "notionApi": {
      "command": "docker",
      "args": [
        "run",
        "--rm",
        "-i",
        "-e", "NOTION_TOKEN",
        "mcp/notion"
      ],
      "env": {
        "NOTION_TOKEN": "ntn_****"
      }
    }
  }
}
Using OPENAPI_MCP_HEADERS (for advanced use cases):
{
  "mcpServers": {
    "notionApi": {
      "command": "docker",
      "args": [
        "run",
        "--rm",
        "-i",
        "-e", "OPENAPI_MCP_HEADERS",
        "mcp/notion"
      ],
      "env": {
        "OPENAPI_MCP_HEADERS": "{\"Authorization\":\"Bearer ntn_****\",\"Notion-Version\":\"2025-09-03\"}"
      }
    }
  }
}
This approach:
- Uses the official Docker Hub image
- Properly handles JSON escaping via environment variables
- Provides a more reliable configuration method
Option 2: Building the Docker image locally
You can also build and run the Docker image locally. First, build the Docker image:
docker compose build
Then, add the following to your .cursor/mcp.json or claude_desktop_config.json
Using NOTION_TOKEN (recommended):
{
  "mcpServers": {
    "notionApi": {
      "command": "docker",
      "args": [
        "run",
        "--rm",
        "-i",
        "-e",
        "NOTION_TOKEN=ntn_****",
        "notion-mcp-server"
      ]
    }
  }
}
Using OPENAPI_MCP_HEADERS (for advanced use cases):
{
  "mcpServers": {
    "notionApi": {
      "command": "docker",
      "args": [
        "run",
        "--rm",
        "-i",
        "-e",
        "OPENAPI_MCP_HEADERS={\"Authorization\": \"Bearer ntn_****\", \"Notion-Version\": \"2025-09-03\"}",
        "notion-mcp-server"
      ]
    }
  }
}
Don't forget to replace ntn_**** with your integration secret. Find it from your integration configuration tab:
Transport options
The Notion MCP Server supports two transport modes:
STDIO transport (default)
The default transport mode uses standard input/output for communication. This is the standard MCP transport used by most clients like Claude Desktop.
# Run with default stdio transport
npx @notionhq/notion-mcp-server

# Or explicitly specify stdio
npx @notionhq/notion-mcp-server --transport stdio
Streamable HTTP transport
For web-based applications or clients that prefer HTTP communication, you can use the Streamable HTTP transport:
# Run with Streamable HTTP transport on port 3000 (default)
npx @notionhq/notion-mcp-server --transport http

# Run on a custom port
npx @notionhq/notion-mcp-server --transport http --port 8080

# Bind to a different host. The default is 127.0.0.1.
npx @notionhq/notion-mcp-server --transport http --host 0.0.0.0

# Run with a custom authentication token
npx @notionhq/notion-mcp-server --transport http --auth-token "your-secret-token"
When using Streamable HTTP transport, the server will be available at http://127.0.0.1:<port>/mcp by default.
Authentication
The Streamable HTTP transport requires bearer token authentication for security. You have three options:
Option 1: Auto-generated token (only for development)
npx @notionhq/notion-mcp-server --transport http
The server will generate a secure random token and write it to a file with restricted permissions:
Generated auth token written to: /tmp/.notion-mcp-auth-token-12345
Option 2: Custom token via command line (recommended for production)
npx @notionhq/notion-mcp-server --transport http --auth-token "your-secret-token"
Option 3: Custom token via environment variable (recommended for production)
AUTH_TOKEN="your-secret-token" npx @notionhq/notion-mcp-server --transport http
The command line argument --auth-token takes precedence over the AUTH_TOKEN environment variable if both are provided.
Unsafe option: disable HTTP authentication
You can disable bearer token authentication only with the explicit unsafe flag:
npx @notionhq/notion-mcp-server --transport http --unsafe-disable-auth
WARNING: --unsafe-disable-auth is unsafe. The server may be reachable to pages you visit via DNS rebinding. Only use it on an isolated network.
When authentication is disabled, the server enables DNS rebinding protection by checking the Host and Origin headers against the configured local host and loopback hosts. The previous --disable-auth flag is still accepted as a deprecated alias, but it will print a warning.
Making HTTP requests
All requests to the Streamable HTTP transport must include the bearer token in the Authorization header:
# Example request
curl -H "Authorization: Bearer your-token-here" \
     -H "Content-Type: application/json" \
     -H "mcp-session-id: your-session-id" \
     -d '{"jsonrpc": "2.0", "method": "initialize", "params": {}, "id": 1}' \
     http://localhost:3000/mcp
Note: Make sure to set either the NOTION_TOKEN environment variable (recommended) or the OPENAPI_MCP_HEADERS environment variable with your Notion integration token when using either transport mode.
Serving multiple integrations (per-request token passthrough)
By default the server authenticates to Notion with a single token baked in at startup, which locks one deployment to one Notion integration. To let a single deployment serve multiple integrations, enable token passthrough so each client supplies its own Notion integration token per connection:
# Enable per-request Notion tokens (flag or ENABLE_TOKEN_PASSTHROUGH=true)
npx @notionhq/notion-mcp-server --transport http --enable-token-passthrough
Clients then send their Notion token on the initialize request using the
dedicated Notion-Token header:
curl -H "Authorization: Bearer <server-auth-token>" \
     -H "Notion-Token: ntn_****" \
     -H "Content-Type: application/json" \
     -d '{"jsonrpc": "2.0", "method": "initialize", "params": {}, "id": 1}' \
     http://localhost:3000/mcp
How the token is resolved for each connection, in order:
- The
Notion-Tokenheader (preferred — unambiguous, and works alongside the server's ownAuthorizationgateway auth). If present it must be a valid Notion token, otherwise the request is rejected with401. Authorization: Bearer ntn_****— only when the server's own bearer auth is turned off (--unsafe-disable-auth), so the header is free to carry the Notion token directly.- Otherwise the startup env token (
NOTION_TOKEN/OPENAPI_MCP_HEADERS), if set, so passthrough and a default integration can coexist on one deployment.
Notes:
- Only values with a Notion token prefix (
ntn_, legacysecret_) are treated as Notion tokens, so the server's gateway secret and a tenant's Notion token never collide. - Each token is bound to its MCP session; tokens are never logged (only a redacted prefix is emitted).
- This is a deliberate token-passthrough setup. Always deploy it over TLS, and
prefer keeping the server's own bearer auth (
--auth-token) enabled as a gateway in front of multi-tenant traffic.
Examples
- Using the following instruction
Comment "Hello MCP" on page "Getting started"
AI will correctly plan two API calls, v1/search and v1/comments, to achieve the task
- Similarly, the following instruction will result in a new page named "Notion MCP" added to parent page "Development"
Add a page titled "Notion MCP" to page "Development"
- You may also reference content ID directly
Get the content of page 1a6b35e6e67f802fa7e1d27686f017f2
Development
Build & test
npm run build
npm test
Execute
npx -y --prefix /path/to/local/notion-mcp-server @notionhq/notion-mcp-server
Testing changes locally in Cursor:
- Run
npm linkcommand from repository root to create a machine-global symlink to thenotion-mcp-serverpackage. - Merge the configuration snippet below into Cursor's
mcp.json(or other MCP client you want to test with). - (Cleanup) run
npm unlinkfrom repository root.
{
  "mcpServers": {
    "notion-local-package": {
      "command": "notion-mcp-server",
      "env": {
        "NOTION_TOKEN": "ntn_..."
      }
    }
  }
}
Publish
npm login
npm publish --access public